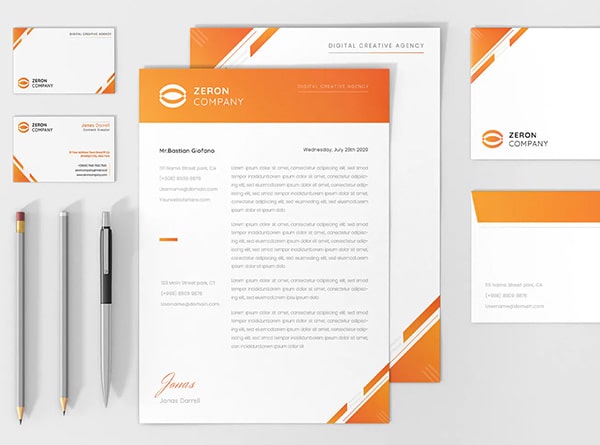
Fintech corporate photography is brand-aligned imagery crafted specifically for financial technology and financial services companies. Executive portraits, team headshots, workplace photography, event coverage, and campaign visuals, all designed to hold up under the scrutiny your audience brings to every touchpoint.
You’re here because the imagery needs to check several boxes at once: credibility with investors and enterprise clients, visual consistency across every channel, privacy and compliance awareness, operational simplicity for busy teams, and minimal disruption to the people in front of the lens. This guide walks through deliverables, local logistics, pricing drivers, licensing structures, compliance considerations, and how to put these assets to work for search visibility.
1. Define Your Visual System Before You Book the Photographer
A fintech photo shoot that starts without a strategic brief ends with a hard drive full of images nobody can use. Disconnected headshots against mismatched backgrounds. Candid office shots that don’t fit your website grid. Founder portraits that look like they belong to a different company than the team page.
The goal isn’t a collection of nice photos. It’s a coherent visual system: one library of assets that works across your homepage hero, About page, LinkedIn profiles, press kit, investor deck, recruiting page, sales enablement materials, and the AI-powered discovery platforms increasingly surfacing brand imagery in search results.
The Creative Balance
The visual tone for financial services photography lives in a narrow corridor. Too corporate and you look like the legacy banks your product is designed to replace. Too casual and you undercut the credibility that institutional clients, investors, and regulators expect. The standard worth aiming for: modern, human, precise, and credible. Every shot should feel intentional without feeling staged.
Core Deliverables and Where They Live
Before the shoot, map every deliverable to its destination. This forces decisions about lighting, background, composition, and wardrobe before anyone picks up a camera.
- Executive portraits: investor relations decks, press kits, board communications, conference speaker bios. These need the widest range of crops and backgrounds.
- Team headshots: website About page, LinkedIn, internal directories, recruiting collateral. Consistency here (same lighting, same backdrop treatment) signals organizational cohesion.
- Office and workspace imagery: homepage hero sections, career pages, social media. Composition should leave generous negative space for headline overlays or UI mockups.
- Founder and leadership portraits: PR features, earned media, annual reports. These carry more editorial flexibility but must still feel connected to the team set.
- Brand lifestyle imagery: campaign assets, blog headers, ad creative. Clean backgrounds and deliberate framing make these adaptable across formats.
What to Avoid
Stock-photo staging is the fastest way to erode the trust your photography is supposed to build. Exaggerated prosperity cues (marble lobbies nobody works in, handshakes over mahogany) read as performative. Anything implying guaranteed financial outcomes creates compliance exposure you don’t need. The strongest fintech photography shows real people in real environments doing recognizable work, composed with enough design discipline that your creative team can actually build around it. When photography alone can’t communicate an abstract product concept, Fintech custom graphics provide branded illustrations and visual elements built to the same standard of credibility.
2. Executive and Leadership Portraits That Signal Credibility
Your CEO’s headshot will get scrutinized before anyone reads a single line of the pitch deck. Investors reverse-image-search founders. Journalists pull leadership photos for articles about funding rounds. Prospective enterprise clients check LinkedIn profiles before agreeing to a discovery call.
That portrait is the first visual handshake. It needs to work.
Where Leadership Portraits Show Up
The list of placements is longer than most teams realize when they’re scheduling the shoot:
- Leadership and advisor bio pages on your website
- LinkedIn profiles (where most professional first impressions actually happen)
- Podcast and speaker bios for conferences and webinars
- Press kits and earned media features
- Funding announcements and investor updates
- Investor decks (the team slide, typically the most scrutinized page after the financials)
A single, well-executed portrait session can supply assets for all of these, but only if the creative direction and deliverable formats are planned in advance.
Creative Direction
Controlled lighting is the foundation. Harsh overhead fluorescents or blown-out window light behind the subject signals a rushed, low-priority shoot. A two-light or three-light setup (or carefully modified natural light) produces consistent, dimensional results that read as professional without tipping into overly retouched territory.
Posture and expression matter more than most subjects expect. The goal is confident and approachable: direct eye contact, relaxed shoulders, a natural expression that lands between “board meeting” and “genuine conversation.” Your photographer should be directing subjects into that middle ground throughout the session.
Wardrobe guidance should go out before the shoot, calibrated to your brand’s level of formality. A neobank targeting Gen Z has different visual codes than an institutional payments platform. Solid colors photograph better than busy patterns.
For backgrounds, three options cover most needs:
- Neutral studio backdrop: clean, versatile, works across every placement.
- Branded office environment: adds context and personality. Requires a tidy, well-lit space that genuinely reflects how the team works.
- Environmental portrait: the subject in a meaningful setting (conference stage, product demo area). Higher editorial value, narrower use case.
Deliverables and Retouching
Request multiple crops from the same session: square (LinkedIn, Slack, internal directories), vertical social (speaker bios, press features), horizontal web bio (About page layouts), and high-resolution print-ready files for conference materials. Getting all of these from one shoot means planning framing with crop flexibility in mind during the session itself.
Retouching boundaries deserve a direct conversation with your photographer. The portrait should look like the person who walks into the room. Removing a temporary blemish or softening under-eye shadows is standard practice. Reshaping facial structure or smoothing skin to the point of artificiality creates a disconnect the moment someone meets the real person. In fintech, where trust is the product, that disconnect costs more than a bad photo ever would.
3. Build a Repeatable Headshot Program, Not a One-Day Shoot
A mismatched team page is one of those problems that creeps in slowly and then hits you all at once. One person was photographed in 2021 against a grey backdrop. Another was shot last quarter with natural light in the new office. A third submitted a cropped vacation photo because they started on Monday and the website needed updating by Friday.
In most industries, that patchwork is a mild annoyance. In financial services, it reads as something worse. Your audience has been trained to scrutinize visual consistency as a proxy for legitimacy. Banks, regulators, and enterprise procurement teams all pattern-match for coherence. When your team page looks like it was assembled from five different company directories, the unspoken conclusion isn’t “they need a photo day.” It’s “they don’t have their house in order.”
Define the Style Template
The fix starts with documentation, not a calendar invite. Before scheduling anything, lock in a style template that becomes the reference standard for every session going forward.
- Lighting setup: specify modifier types, positions, and ratios precisely enough that a different photographer could replicate the look.
- Backdrop and environment: the exact background color, material, or office location, including window orientation and time of day if shooting on-site.
- Crop and composition: head-and-shoulders framing at a defined aspect ratio with consistent headroom and eye placement.
- Wardrobe notes: the range of acceptable attire calibrated to your brand. Solid navy and charcoal for an institutional payments company. Smart-casual earth tones for a consumer neobank.
- Expression range: “approachable but not grinning” is surprisingly useful direction when it’s codified rather than improvised on shoot day.
- Retouching profile: specific parameters your retoucher follows. Blemish removal yes, skin smoothing no. Color grading to a defined preset so every portrait receives consistent treatment regardless of capture date.
Plan for Minimal Disruption
Schedule short appointment windows (15 to 20 minutes per person) clustered around existing meetings or office days. If leadership is already in the building for a quarterly review, add headshot slots before or after. The photographer arrives early, sets up to the documented template, and runs an efficient rotation. No elaborate staging. No wasted time.
Future-Proof for Growth
A fintech adding ten employees over the next two quarters needs those new hires to look like they belong on the same team page as everyone photographed months earlier. If the style template lives in a shared document with lighting diagrams, backdrop specs, and retouching presets, a photographer shooting a new hire in June can match portraits from January.
For teams distributed across Los Angeles, Orange County, and other locations, the template becomes even more critical. A second photographer working from the same specifications in a different office produces results that sit seamlessly alongside the original set. Without that documentation, every location introduces visual drift.
Plan recurring refresh days, annually or semi-annually, to capture new team members and update portraits that have aged out. This turns headshot photography from a reactive scramble into a quiet, predictable line item on your operational calendar.
4. Workplace and Environmental Photography for Fintech Brands
Most fintech products are invisible. They live inside screens, behind APIs, between servers. Your audience can’t tour the infrastructure or hold the product in their hands. That abstraction is a real branding challenge, because when everything about your company is digital, the physical environment where your team works becomes one of the few tangible proof points available.
Workplace photography bridges that gap. It shows how your team collaborates, where decisions get made, and what the culture looks like in practice. Done well, these images make an abstract financial product feel grounded. Done poorly, your brand stays a logo floating in white space.
What to Capture
The shot list should be broader than most teams initially plan for. Conference rooms during active product discussions. Collaborative moments where two or three people are genuinely solving a problem, not performing for the camera. Reception areas and branded details that establish a sense of place. Leadership in context, not posed at a desk but engaged in the work, connecting executive portraits to the day-to-day reality of the company.
Product-in-context shots are particularly valuable. A laptop showing a dashboard, a monitor displaying a user interface, a whiteboard mapping out a product flow. These turn your workspace into visual evidence that a real product exists behind the marketing language. The caveat: every screen visible in the frame needs to be controlled or staged safely. When dashboards or data displays appear in product-in-context shots, professional Fintech data visualization design ensures the on-screen content looks as polished and intentional as the photography framing it.
Where These Images Work
- Homepage hero sections where environmental shots with negative space allow headline overlays
- Careers and culture pages where candidates evaluate whether they’d want to work there
- Investor decks where workspace imagery reinforces operational maturity
- Sales collateral where a real office photo outperforms stock imagery every time
- Social media and announcements where authentic workplace moments outperform polished graphics
A photo of your team around a whiteboard covered in product architecture communicates more about your company’s substance than any mission statement.
Operational Safeguards
This is where fintech workplace photography diverges from standard corporate shoots. Financial services environments contain sensitive information by default, and a single careless frame can create a compliance problem.
Before the photographer arrives, run a systematic sweep of every space being captured. Clear desks of confidential documents, client correspondence, and printed materials containing account details. Screens visible in the background need to display staged content or be powered off entirely. If a monitor shows a real dashboard, load a demo environment with fictional figures before the shoot begins, or blur the data in post-production.
People visible in the frame need documented consent, particularly in common areas where someone might walk through a shot unintentionally. Branded partner materials, vendor logos on whiteboards, or client names on project boards all require approval before publication. One overlooked detail in a background can trigger a conversation you’d rather not have.
The goal is imagery that feels authentic and operational without exposing anything that should stay internal. That balance requires preparation, not improvisation on shoot day.
5. Founder and Investor-Relations Portraits That Carry Weight
A basic headshot confirms what someone looks like. A founder portrait needs to do considerably more.
When an image accompanies a funding announcement, sits inside an annual report, or appears on a conference speaker page, it’s carrying narrative. It’s communicating stability, momentum, and the kind of composed authority that makes investors, analysts, and prospective partners feel like the company behind this face is worth their attention. The standard team headshot wasn’t designed for that job.
Why the Standard Headshot Falls Short
Team headshots are built for consistency across a page. Same lighting, same backdrop, same framing. That uniformity is exactly what makes them effective on your About page and exactly what makes them insufficient for investor relations. A founder portrait needs to carry story, to feel current, composed, and suitable for external scrutiny from people whose job is evaluating risk. Board members reviewing your annual update, journalists covering your Series B, analysts assessing leadership credibility: these audiences read the image before they read the text.
Investor-relations imagery also travels further and lives longer than internal team photos. Media kits get passed between editors, conference bios get repurposed across event sites, and funding announcements circulate through investor networks. The portrait needs to hold up across all of those without looking out of place or dated six months later. When those portraits land inside a pitch deck or board update, Fintech presentation design services ensure the surrounding slides match the visual caliber of the photography itself.
Highest-Value Placements
Map the specific destinations before the session, because each one informs creative direction:
- Funding announcements and press releases where the image runs alongside financial figures
- Annual reports and board update materials distributed to stakeholders expecting institutional-grade presentation
- Pitch decks (particularly the team slide investors scrutinize immediately after the financials)
- Media kits and analyst commentary where the portrait represents the company in editorial contexts
- Conference and keynote speaker pages where the image competes visually with every other speaker on the roster
- Partner announcements where two companies appear side by side and visual parity matters
Guiding the Visual Tone
Environmental or editorial portraits work well when the setting adds genuine context. A founder photographed in the product lab, a conference environment, or a distinctive office space tells a richer story than a neutral backdrop. The key distinction: the environment should feel intentional, not incidental. If the setting doesn’t add meaning, a clean studio portrait with controlled lighting is the stronger choice.
Styling should be precise without veering into either extreme. Too casual and the image undermines credibility with institutional audiences. Too staged and it reads as performative, which is its own credibility problem. The target is a portrait where the subject looks like someone who runs something serious, photographed by someone who understood the assignment.
6. Build a Pre-Shoot Shot List That Turns One Event Into Months of Content
Most event photography gets treated like documentation. Someone with a camera shows up, captures what happens to unfold, and the team ends up with 400 images of the same stage angle and a handful of blurry networking shots. The recap post goes out using the three usable photos, and the rest sit in a folder no one opens again.
That’s not a photography problem. It’s a planning problem.
The Shot List Is the Strategy
A shot list isn’t a suggestion sheet for the photographer. It’s a content brief disguised as logistics. Every frame should correspond to a specific downstream use, mapped before the event begins.
Build yours around these categories, weighted toward what your team will actually publish:
- Arrivals and registration: early energy, branded signage, the moment before everything starts. These set the scene for recap articles and social carousels.
- Stage and keynote moments: wide establishing shots for banners, tight crops of speakers for bio pages and press outreach.
- Panels and audience reactions: capture both the speakers and the crowd responding. Reaction shots are chronically under-photographed and consistently the most engaging images on social.
- Executive and founder portraits: pull key leaders aside for 90 seconds of controlled lighting. You get a current portrait tied to a specific moment in company history.
- Networking and hallway conversations: the unscripted moments that make the brand feel human. Investors talking with founders, partners mid-discussion.
- Branded details and product demos: signage, stage design, name badges, demo stations. These texture images fill out carousels and article headers when you need variety beyond people shots.
- Partner and sponsor visibility: capturing logos, activations, and sponsor presence protects the relationship and builds next year’s pitch deck.
Instruct the photographer to capture both wide-frame and tight-portrait compositions of the same moments. A wide shot of a packed panel becomes a homepage banner. A tight crop of the moderator becomes a speaker bio image. Same event, two very different assets from a single position.
Map Reuse Before the First Shutter Click
One well-photographed event can supply assets for:
- The event recap article on your blog
- A week of LinkedIn posts tagging speakers, sponsors, and attendees
- Email follow-up to attendees and prospects who didn’t make it
- Press outreach with ready-to-publish imagery
- Recruiting content showing company culture in action
- Internal communications reinforcing team momentum
- Future sponsor decks proving the caliber of past events
- Conference speaker bios that stay current for the next 12 months
If you’re not planning for at least six of these uses before the event, you’re underinvesting in the capture and over-relying on a single post to justify the spend. Pairing event photography with Fintech infographic design can transform key takeaways and session data into shareable visual assets that extend the content lifecycle well beyond the recap post.
Define Delivery Expectations Early
Two delivery tiers keep both your social team and your long-form content pipeline moving. First, a set of fast selects: 15 to 25 lightly edited images delivered within 24 to 48 hours for timely social posts, PR distribution, or same-week email follow-up. Second, the full curated gallery delivered within one to two weeks, color-corrected and organized for archival use.
Ask your photographer to include captions or metadata notes identifying speakers, event names, panel topics, and any usage restrictions. Without that context, even strong images become unusable three months later when nobody can remember who was in the frame or which session was being captured.
7. On-Site Photo Shoots in Los Angeles and Orange County: Planning and Production
Your team’s calendar doesn’t pause for a photo shoot. That’s the operational reality for fintech, payments, lending, wealth management, banking, insurtech, and B2B financial software companies running active offices across Southern California. The shoot needs to fold into the workday, not hijack it.
Getting that right isn’t about lowering expectations for the photography. It’s about raising the standard for pre-production planning so the on-site session runs clean, fast, and invisible to anyone who isn’t scheduled to be in front of the camera.
Pre-Shoot Planning: The Logistics That Make or Break It
A location questionnaire sent two to three weeks before the session eliminates the surprises that derail timelines. Cover these specifics before anyone loads a gear case:
- Space requirements: which rooms are available, approximate dimensions, and whether furniture can be repositioned. A 10×12 conference room works for headshots. Team shots or environmental portraits need more depth.
- Backdrop options: walls, corners, or architectural features that suit your brand’s style template. A clean white wall, a glass-walled conference room, or a branded reception area each produce a different visual tone.
- Access and security: building check-in procedures, visitor badges, elevator access, and restricted zones the photographer should avoid.
- Parking and loading: where the equipment vehicle can park, whether a loading dock or freight elevator is available, and how far gear travels to the setup location.
- Power and electrical: confirm outlet locations in the shooting space. Studio strobes pull meaningful current, and tripping a breaker mid-session on a shared office floor is exactly the disruption you’re trying to prevent.
- Natural light assessment: window orientation and time of day matter. South-facing glass at 2 PM in Los Angeles produces beautiful but intense light that shifts quickly. Morning sessions on north-facing floors offer softer, more consistent conditions.
- Quiet room for portraits: executive headshots benefit from a controlled, private space without foot traffic or background noise. A small conference room with a closed door works.
Beyond the physical space, sort through the human logistics in advance. Distribute wardrobe guidance at least a week out, specifying what works (solid colors, structured layers) and what doesn’t (busy patterns, competing logos). Lock leadership time slots with accepted calendar holds. A founder who “might swing by” is a founder who won’t be there. Finalize the shot list and share it with the photographer and your internal coordinator so everyone works from the same document. And identify backup locations: if the preferred room gets claimed for an urgent client call, knowing the secondary option costs nothing. Scrambling on shoot day costs the entire schedule.
Production Flow: Minimal Footprint, Maximum Output
The on-site session should feel like a series of short, scheduled appointments rather than an all-day production.
Allocate 10 to 20 minutes per person for headshots, with buffer time between subjects for setup adjustments and the inevitable schedule slip. Assign a single internal coordinator who manages the rotation, walks subjects to the set, and handles last-minute changes. Distributing that responsibility across multiple people introduces confusion.
Post the schedule in Slack, pin it in email, tape it to the door of the shooting room. Everyone knows when they’re expected and how long it takes. Schedule around standing meetings, client calls, and trading hours so the shoot adapts to the business rhythm, not the other way around. If your marketing team has a press deadline or a social post planned for that evening, establish the expectation for same-day selects before the session. A handful of lightly edited images delivered by end of day is a reasonable ask when communicated in advance, not sprung at wrap.
The goal across all of this is predictability. When your team in Los Angeles or Orange County knows exactly what the shoot requires, how long it takes, and what their role is, the production disappears into the workday. That’s what lets you capture polished, brand-consistent imagery without turning an active office into a film set.
8. Confidentiality, Compliance, and Approval Workflows for Financial Services Photography
Every photo shoot in a financial services environment is, at some level, a security event.
That probably sounds overstated until you consider what’s casually visible in any working fintech office on a given Tuesday: client names on a project board, portfolio performance on a dashboard, compliance notes on a whiteboard, visitor badges with full names sitting on a reception desk. A photographer capturing “authentic workplace culture” can inadvertently document exactly the kind of information your compliance team spends considerable effort keeping contained.
The solution isn’t restricting photography to sterile, staged environments. It’s building controls into the production process so confidentiality is protected without sacrificing the authentic imagery your brand actually needs.
On-Site Privacy Controls
Start with the photographer relationship itself. A signed NDA before the session isn’t excessive in financial services. It’s baseline. Request proof of insurance (general liability and equipment coverage at minimum), and confirm the photographer understands the nature of the environment they’re entering. That means they know not to wander into restricted areas, not to photograph access credentials, and not to capture screens, documents, or whiteboards without explicit clearance.
Visitor access protocols apply to the photography team the same way they apply to any outside vendor. Badges, sign-in procedures, escort requirements for sensitive floors.
Before the session starts, run a deliberate sweep of every space that will appear in frame:
- Monitors and screens: power off, display a screensaver, or load a demo environment with fictional data.
- Whiteboards and glass walls: erase or cover anything containing client names, deal terms, or internal metrics.
- Desks and paperwork: clear printed documents, client correspondence, and anything with personally identifiable information.
- Dashboards: wall-mounted displays showing real-time performance data are a common feature in fintech offices and a common oversight during shoots.
- Badges and credentials: remove visible name badges, security passes, and keycards from desks and lanyards.
- Restricted areas: confirm physical barriers or signage prevent the photographer from capturing sensitive operations.
This sweep takes 15 to 20 minutes and prevents problems that take weeks to unwind.
The Approval Workflow
Capturing the images is half the process. Controlling what gets published is the other half, and this is where many teams improvise when they should systematize.
Build a defined review sequence before the shoot happens:
- Leadership selection: a designated stakeholder reviews the full gallery and narrows hundreds of images to a working set.
- Retouching review: selected images go through post-production. Once retouched, the stakeholder confirms edits match brand standards.
- Compliance or legal review: for images appearing in regulated communications, investor materials, or public-facing campaigns, route through compliance. They’re checking for unintended claims, visible confidential information, and regulatory exposure.
- Model releases: every identifiable person in a published image needs a signed release collected on shoot day. Include usage notes specifying where images may appear and for how long.
- Revision limits: establish a clear number of retouching rounds in the contract. Two rounds is standard. Without defined limits, the approval cycle expands indefinitely.
File Organization
A photography archive without structure is a liability masquerading as an asset. Name files and organize folders using a consistent taxonomy:
- By person: portraits tagged with subject name and department
- By department: group shots organized under the relevant business unit
- By location: separate folders for each office or event venue
- By use case: headshots, workplace, event, campaign, investor relations
Embed metadata (date, photographer, usage rights, expiration) directly into the files. When someone on your team needs a specific portrait 14 months from now, searchable metadata is the difference between finding it in 30 seconds and giving up after ten minutes of scrolling through undifferentiated folders.
Controlling Visual Risk
Financial services imagery carries implicit messaging beyond what’s literally in the frame. Photographs suggesting guaranteed outcomes (champagne toasts next to trading screens, exaggerated displays of prosperity) create compliance exposure even without explicit text claims. The “net impression” standard regulators apply to marketing materials extends to visual content.
Avoid imagery that leans into extremes. Unserious casualness undermines the credibility institutional clients expect. Exaggerated affluence suggests outcomes you can’t guarantee. The visual tone that holds up under scrutiny is modern, human, precise, and professionally reviewed before it reaches any external audience.
9. Pricing Drivers, Licensing, and Search-Ready Delivery for Fintech Photography
The quote arrives in your inbox as a single number. No breakdown, no usage terms, no indication of what happens to the files once you’ve paid. You’re left reverse-engineering what’s included and whether the images can appear in next quarter’s investor deck without a follow-up negotiation.
That ambiguity costs more than money. It costs time, creates internal confusion, and introduces risk when images show up in contexts nobody explicitly cleared.
What Shapes the Investment
Photography pricing in financial services isn’t arbitrary, but it is variable. The factors that move the number are worth understanding before you scope the project, because each one represents a decision point your team controls.
- Number of subjects: photographing five executives costs less than photographing 40 employees across three departments. Volume affects session length, retouching hours, and deliverable count.
- Locations and travel: a single-office shoot is simpler than a two-day rotation covering multiple offices. Travel time, parking logistics, and potential overnight stays all factor in.
- Crew size: a solo photographer handles headshot rotations efficiently. Environmental portraits or large team compositions may require a lighting assistant, digital tech, or stylist.
- Production complexity: studio-grade lighting, multiple backdrop changes, and art-directed scenarios take longer per frame than a streamlined headshot rotation.
- Shoot length and retouching depth: a half-day covers headshots for a mid-size team. A full day accommodates leadership portraits, workplace environmental shots, and product-in-context imagery. Extensive compositing or background replacement adds post-production hours beyond standard color correction.
- Deliverable count and rush delivery: twenty retouched selects from a headshot session is a different scope than 80 images spanning portraits, workplace, and event coverage. Same-day or 48-hour turnaround commands a premium over standard delivery windows.
- One-off versus recurring: a single executive portrait session is scoped differently from a recurring headshot program serving a growing team across multiple offices. Recurring engagements allow for negotiated rates, style template consistency, and predictable budgeting.
The clearer you are about these variables when requesting proposals, the more accurate and comparable the quotes you receive.
Licensing in Plain Language
Image licensing is where confusion compounds. Paying for photography does not automatically mean you own the photographs.
In most professional engagements, the photographer retains copyright and grants a license to use the images under defined terms. Full copyright assignment is a separate negotiation at a higher investment. Neither arrangement is inherently better. What matters is that the terms match how you’ll actually use the imagery.
- Usage scope: website, LinkedIn, PR and earned media, investor decks, recruiting materials, paid advertising, internal communications, conference materials, third-party publications, sales enablement. Each channel should be named in the agreement. Assumptions are where disputes start.
- Duration: some licenses are perpetual. Others expire after a defined window. If your About page is built around portraits licensed for 12 months, you have a problem at month 13.
- Territory: global usage or restricted to specific markets. For fintech companies operating across jurisdictions, a territory-limited license creates friction the moment your brand crosses a border.
- Exclusivity: an exclusive license prevents the photographer from licensing the same images elsewhere. Non-exclusive is standard and usually sufficient for corporate portraiture.
- Model releases: signed releases from every identifiable person, specifying permitted uses and duration. Without them, publishing photos in paid advertising or third-party channels creates legal exposure.
Read the licensing agreement before the session, not after. If your marketing team plans to use founder portraits in paid LinkedIn campaigns and the license covers only organic web use, you’ll discover the gap at the worst possible moment.
Search-Ready Delivery
Strong imagery that search engines and AI systems can’t interpret is invisible imagery. Request these from your photographer or build them into your internal handoff process:
- Descriptive filenames:
ceo-portrait-company-name-2025.jpgtells search engines and your team what the file contains.IMG_4782.jpgtells nobody anything. - Alt text guidance: brief, descriptive notes your web team can adapt into proper alt attributes. “CFO speaking at annual fintech summit, Los Angeles” is useful. “Photo” is not.
- Caption and context notes: who is in the image, what’s happening, where it was taken. This metadata supports internal organization and structured content around the images.
- Web-friendly compression: images optimized for web delivery alongside high-resolution archival versions. A 15MB portrait on your About page quietly erodes the Core Web Vitals performance your technical team is working to maintain.
- Organized galleries: images delivered in clearly labeled folders matching your taxonomy (by person, department, use case) rather than a single undifferentiated download.
For photography pages on your own site, structured data and FAQ markup help search engines and AI discovery platforms understand the context of your visual assets. When someone asks an AI assistant about your leadership team or searches for your company visually, properly structured and described imagery is what surfaces. Unlabeled files in a neglected media library are what doesn’t. Photography is one component of a broader Fintech Content Marketing strategy that ensures every visual and written asset works in concert to build discoverability and brand authority over time.
Frequently Asked Questions
How much do fintech audience research services usually cost?
Most credible firms scope custom statements of work rather than publishing fixed rates, because the variables shift the budget dramatically. Directional ranges run from $25,000 for a focused discovery sprint to $150,000 or more for a multi-method program that includes quantitative validation. The biggest price drivers are recruitment difficulty (executive panels and underbanked fieldwork cost significantly more than general consumer panels), geographic spread, method complexity, and whether the scope includes quant survey validation on top of qualitative findings. Those first two variables, recruiting senior B2B stakeholders and reaching underserved populations, tend to move the budget fastest.
How long should a good fintech audience research project take?
A credible engagement typically runs six to twelve weeks, covering stakeholder alignment, screener development, recruitment, fieldwork, synthesis, and a structured readout. A fast discovery sprint (qualitative interviews with a defined segment) can land in six weeks. Fuller programs involving segmentation, quantitative validation, or multi-market recruitment need the longer runway. Compressing below six weeks usually means cutting corners on recruitment quality or synthesis depth, both of which undermine the entire investment.
What deliverables should I expect from a serious partner?
At minimum: validated personas, a segmentation matrix with priority scoring, journey maps tied to real behavioral data, trust and messaging findings, feature or benefit prioritization outputs, raw data or session clips for internal review, and an implementation roadmap connecting each finding to a business metric. The critical test is whether the deliverables help product, marketing, and leadership make specific decisions. If the final output summarizes interviews without telling anyone what to do differently, the research hasn’t finished its job.
Should we do this in-house or work with a specialist partner?
Internal teams win at continuous listening, existing product analytics, and institutional context. A specialist wins where recruitment is hard (senior executives, underbanked populations), where neutral synthesis prevents internal politics from filtering findings, where cross-functional alignment needs an outside voice to hold, and where compliance-sensitive study design requires specific expertise. The best outcomes usually blend both. The right partner feels like an extension of the team rather than a vendor managing a handoff, which is exactly the model Urban Geko brings to research-to-execution engagements.